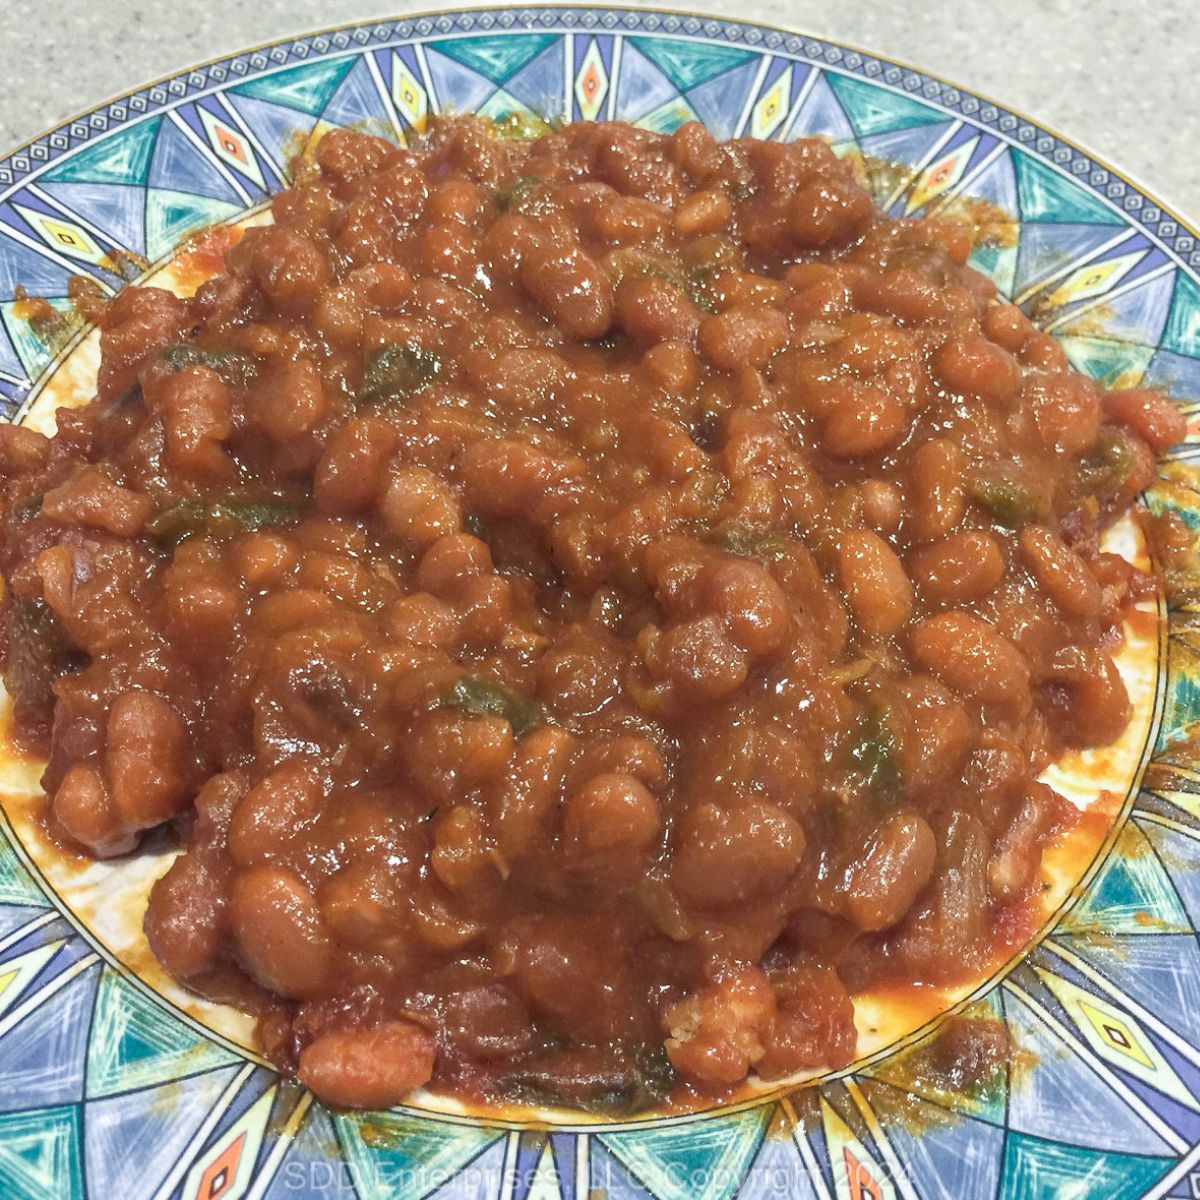
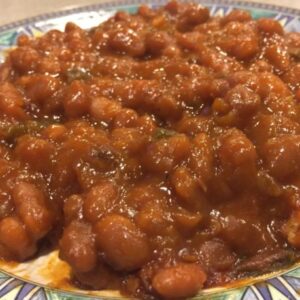
The grills and BBQ pits are going full steam. Its time for good food and fun times with family and friends and that means some creative side dishes, like everybody's favorite, Baked Beans. Sweet Daddy D's no-angst recipe adds deep flavor to pork 'n beans with bacon, caramelized onions, and a sweet and tangy sauce, slowly baked in the oven. The result? Darn Good Baked Beans. We'll even share a few shortcuts so you can enjoy these Baked Beans even if you don't have much time.
This post is not sponsored, but you will find affiliate links on this page. As an Amazon Associate, I earn from qualifying purchases. The price you pay as a consumer does not change, but I may make a small commission based on your purchase.
Jump to:
What Makes These Beans Darn Good?
The flavor-to-effort ratio in this recipe is about 10 to 1. Why are these beans so good? Simplicity: open a couple of cans of pork and beans, then add a few simple ingredients that you probably have in your fridge and pantry. You can whip these up pretty quickly (some ideas below), or you can slow down the process and draw every bit of flavor from this recipe. Much of the cooking is passive time, giving you lots of time to prepare the rest of the meal.
Here's What You Need
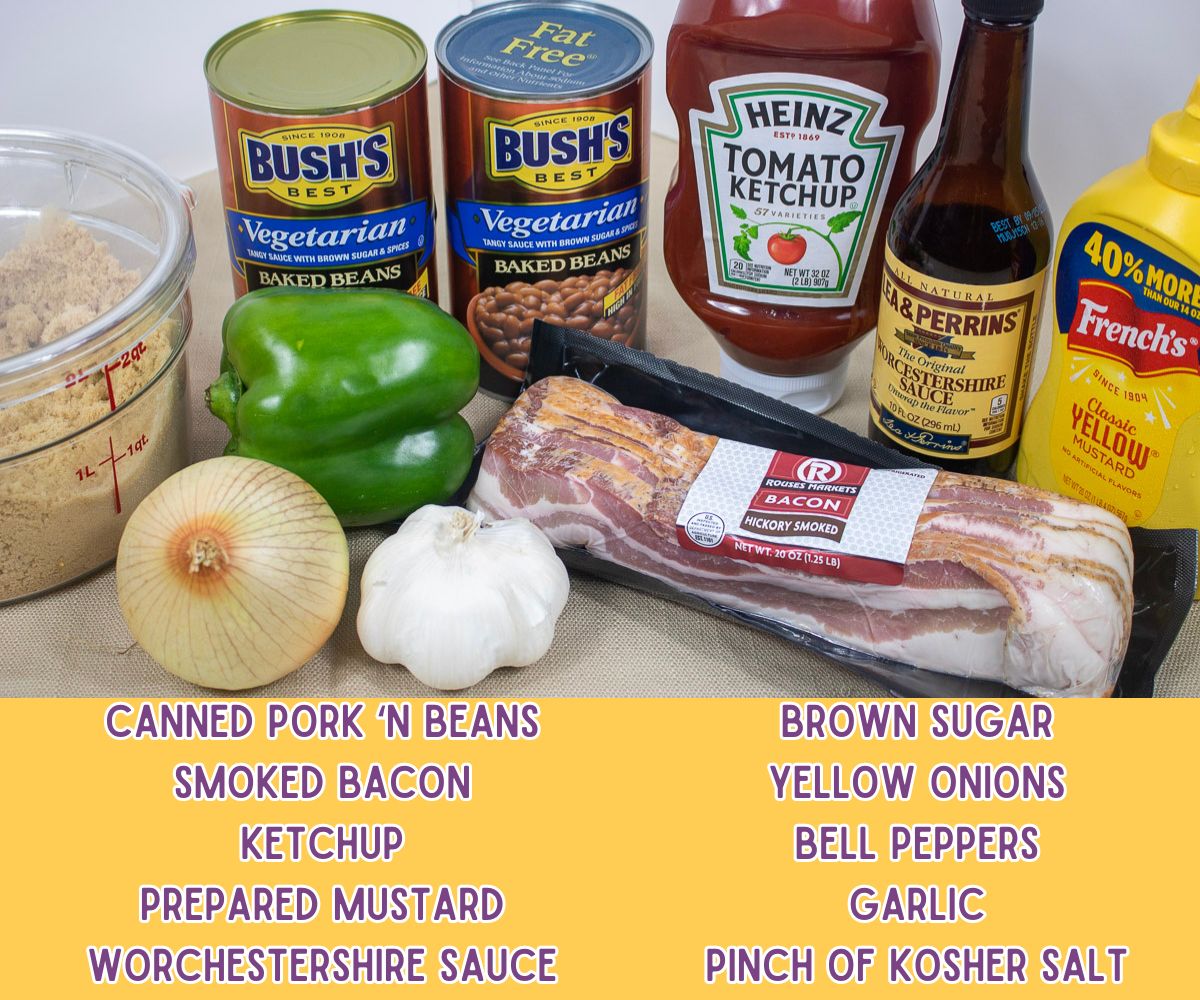
Ingredient Notes
- Canned Beans: I developed this recipe using canned pork and beans. Canned beans are generally rehydrated Navy Beans. I try to use canned beans that are not flavored with other ingredients, like Maple-Bacon, Honey Sweet, or Barbeque. Use your favorite brand, I've liked Van Camp and Bush's.
- Bacon: Use a smoked bacon or bacon grease saved from another recipe.
- Brown Sugar: I use light brown sugar, but dark brown is a good substitute.
- Salt: Depending on the canned beans you choose, the amount of sodium will vary. Sample the sauce before going in the oven and add more salt if needed.
Equipment
No special equipment is needed to make this recipe. This is a one-pot recipe: These Baked Beans can be made in a Dutch oven like this enamel one or this cast-iron one. That's all you need besides prep equipment, like a chef's knife, cutting board, measuring cups and spoons, and prep bowls.
Hints and Tips (FAQs)
Leftover baked beans can be kept in the refrigerator for 3 to 4 days and in the freezer for up to two months. Make sure to store them in an airtight container for the best quality. When it's time to reheat, thaw them in the fridge overnight if frozen. They can be reheated in the microwave, on top of the stove, or in the oven (350 degrees Fahrenheit) for 10 to 20 minutes or until heated all the way through.
This recipe assumes 15-ounce cans of beans. If you are using the 28-ounce cans, fill it halfway. Fill one of the cans with water, swirl it around, and pour its contents into the other cans. Repeat this a few times and you will end up with water flavored with the juice from the beans. If you are baking these for a couple of hours, it's important to add water periodically so the beans don't get too thick. as A you stir the beans periodically, add as much water to the beans, to reach your preferred level of thickness.
Beans are a good source of protein and fiber according to research at North Dakota State University. That makes them important components in heart health and diabetic control. Canned beans have about the same nutritional values as dry beans, but with canned beans, there are added ingredients, like sugar and sodium. I suggest reading the label carefully to see what is being added. Look for low-sugar or low-sodium pork and beans if you are controlling those ingredients. Here's a deep dive into comparing canned and dry beans by our friends at weekand.com.
Absolutely. You can make these a day or two in advance. Let the cooked beans cool down, then place the beans in an airtight container in the fridge. You can make the recipe all the way through, or make them up to the point of placing the beans in the oven. On the day you want to serve them, just finish cooking the beans as directed in the oven.
Here's What You Do
First…you have a beer. Are you getting ready for a big gathering? Is the BBQ Grill or smoker warming up? You probably already have a beer. But even if you're only having a weeknight family dinner, pop the top and sip while you read the recipe from start to finish. Learn what you'll need and what to do with each ingredient. Make this a true no-angst recipe by preparing yourself and the ingredients beforehand.
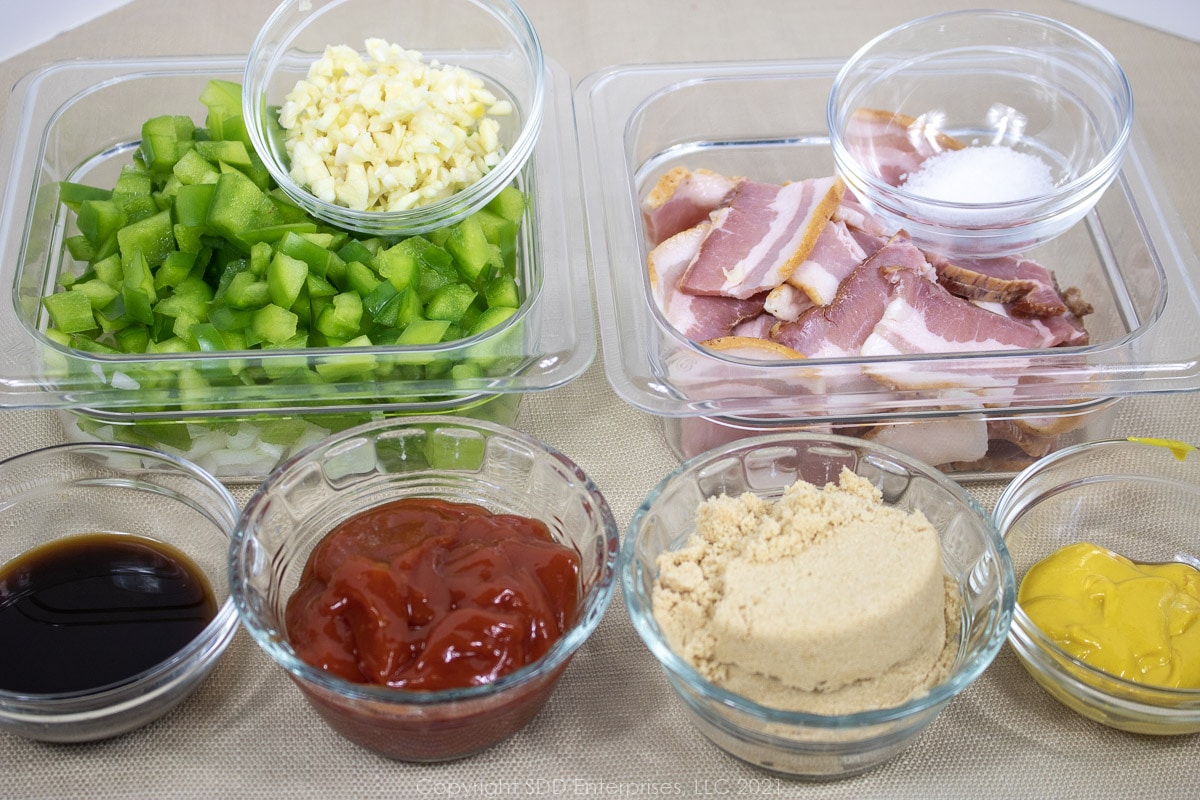
Mise En Place
'Everything in its place." A term used in professional kitchens to describe the proper planning procedure for a specific station.
Auguste Escoffier - The School of Culinary Arts
Here are simple steps to prepare your ingredients before starting to cook:
- Open the cans of beans.
- Roughly chop the yellow onions and bell peppers and place them in the same prep bowl (they go in the Dutch oven together).
- Roughly chop the garlic and slice the bacon into 1 to 2-inch pieces. Place these in separate prep bowls.
- Measure the brown sugar, ketchup, mustard, Worcestershire sauce, and a pinch of salt in small prep bowls or measuring cups.
- Preheat the oven to 300 degrees Fahrenheit.
Mix the Sauce
What happens in this step? The sauce gives the beans that sweet and tangy edge. Making this before you start cooking gives the ingredients time to meld.
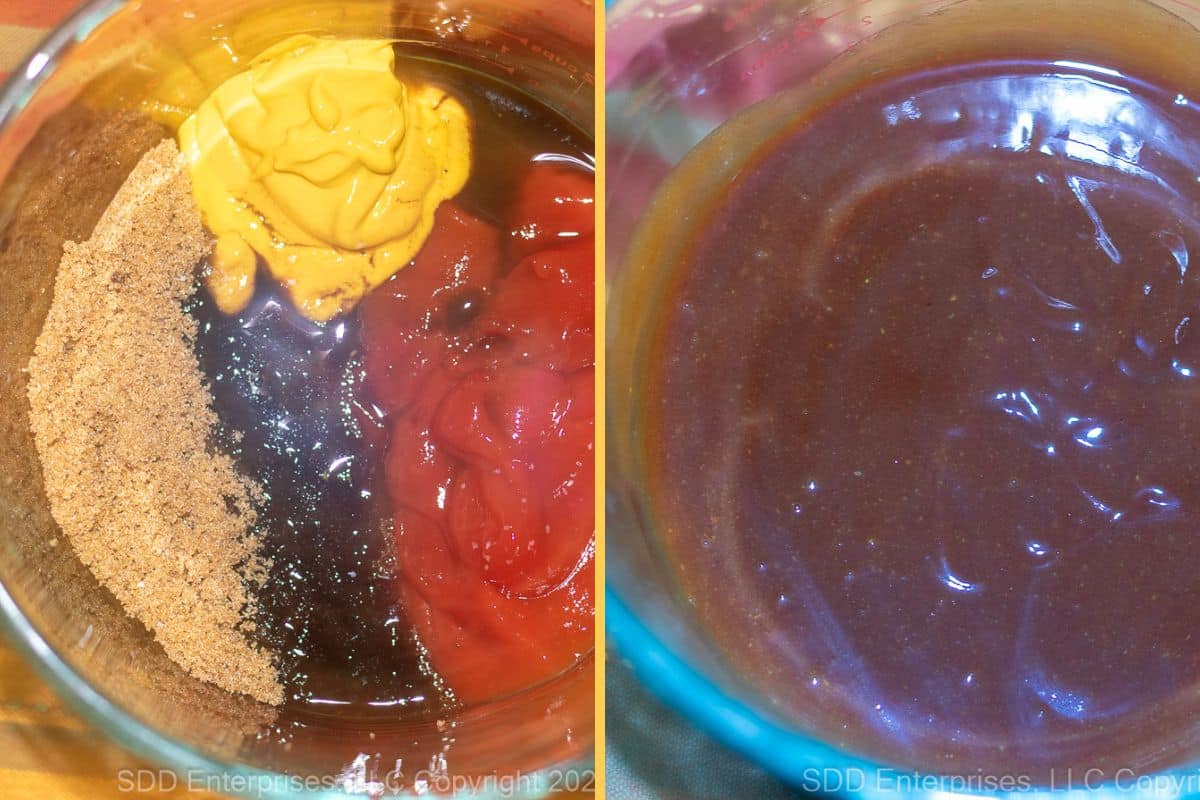
- Add the brown sugar, ketchup, Worcestershire, prepared yellow mustard, and a pinch of salt in a large measuring cup or prep bowl.
- Mix until the brown sugar is dissolved and all the ingredients are thoroughly mixed. Set aside while you prepare the beans.
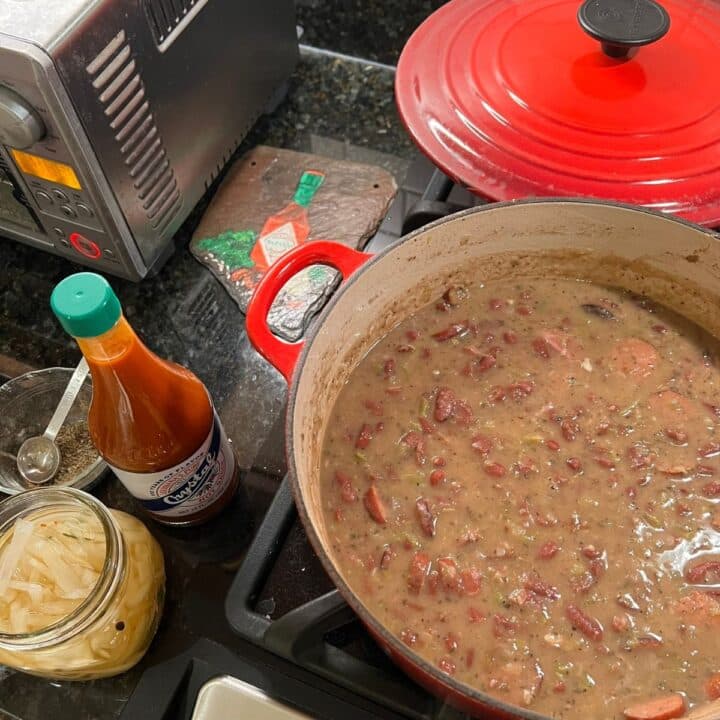
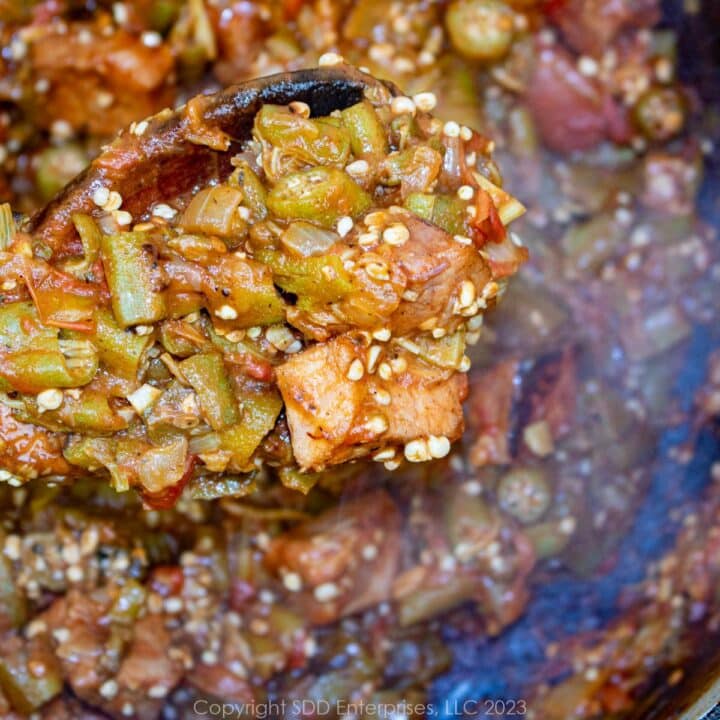
Carmelize the Onions and Bell Peppers
What happens in this step? Great flavor is derived from the bacon grease and caramelized onions. Don't rush this part: render the bacon without burning and slowly caramelize the onions and green peppers to establish a flavor foundation.
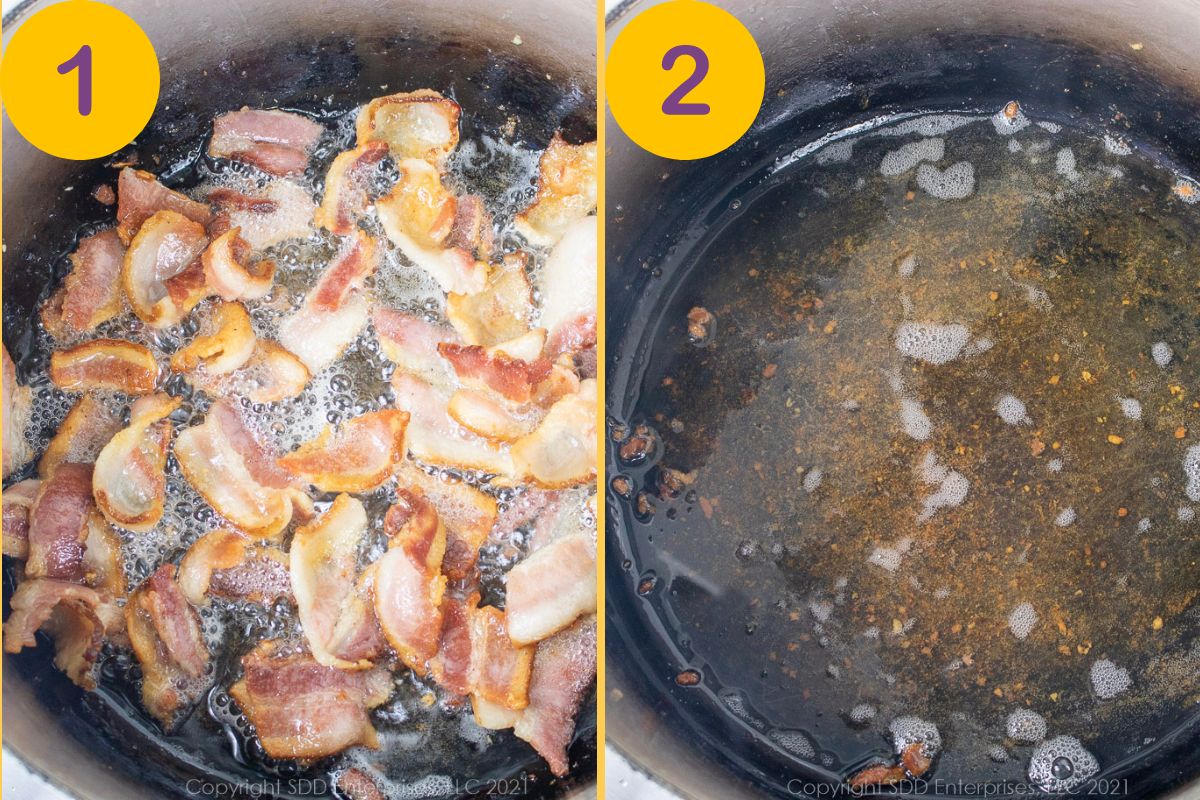
- Fry the bacon in a large, heavy-bottom Dutch oven with a heavy lid over medium heat, until all the fat is rendered out, about 5 to 8 minutes.
- Remove the bacon and set aside, but leave the bacon grease in the pan.
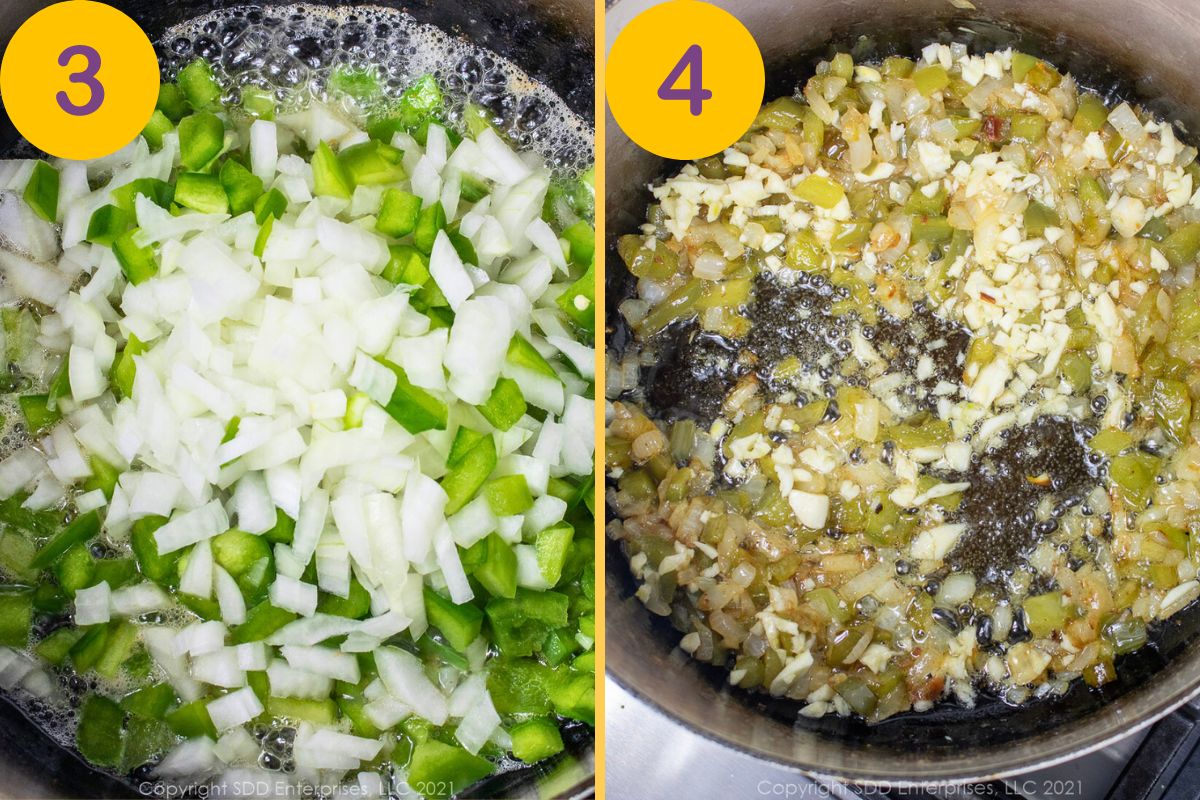
- Add the yellow onions and green bell peppers to the bacon grease, maintain a medium heat and let the onions start to caramelize. Stir often so they don't stick and burn. This could take 15 or 20 minutes
- When the onions are caramelized, add the garlic and stir well. Stir for about 2 minutes until the great garlic aroma is on your nose.
Lagniappe Tip: Taking the time to carmelize the onions yields big flavor benefits, but if you don;t want to spend the time, check out the paragraph above (I Don't Have All Day!) for some time saving tips.
Mix the beans and the Fixins'
What happens in this step? Now we will combine the beans and fixings with the caramelized onions and seasonings and prepare them for the oven.
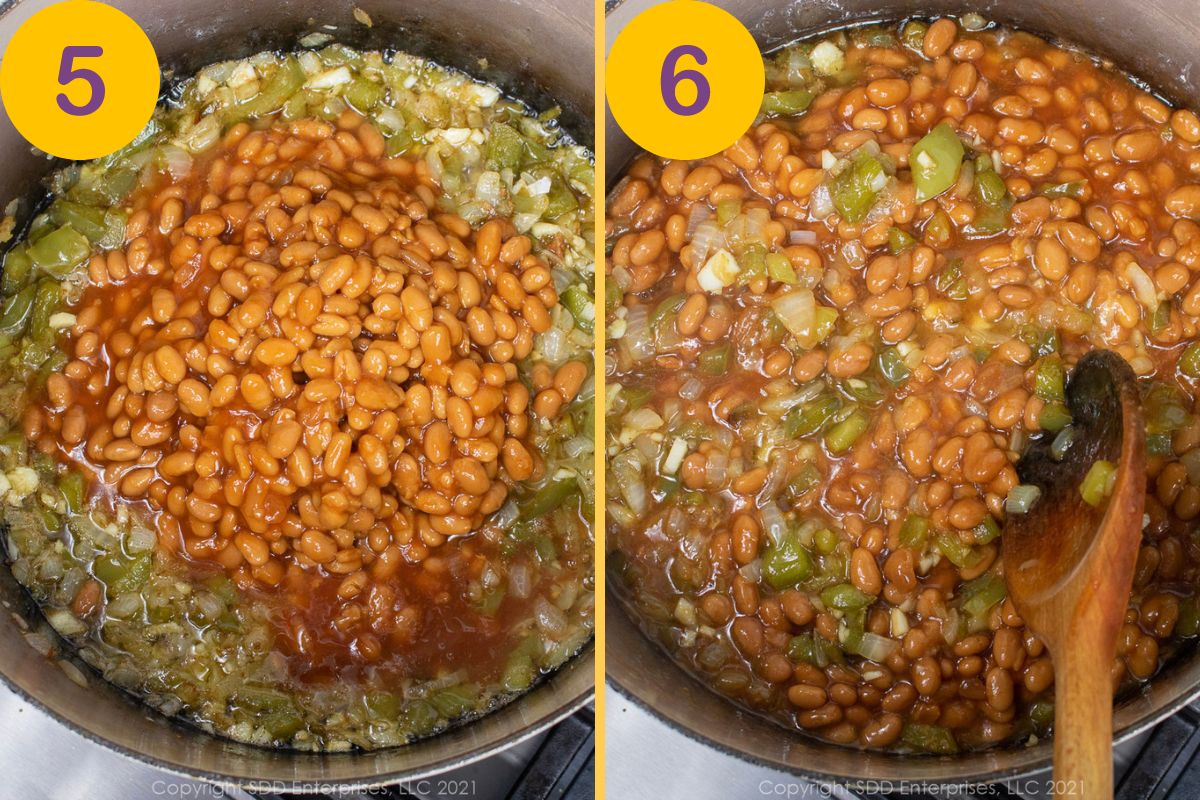
- When the garlic is aromatic, it's time to add the beans and their liquid.
- When the cans are empty, fill one of the empty cans with water (see the Hints and Tips section about how much water to use). Stir the beans well and add about a half can of water. Make sure everything is well mixed.
- Bring the beans to simmer and let them simmer slowly for about 5 minutes. Stir the Fixins' (brown sugar/ketchup mix) into the beans and
- let them return to a simmer for another 5 minutes.
Finish in the Oven
What happens in this step? The beans will spend up to three hours in a low oven so that the flavors fuse and sweeten. This is when that unmistakable flavor of baked beans is created.
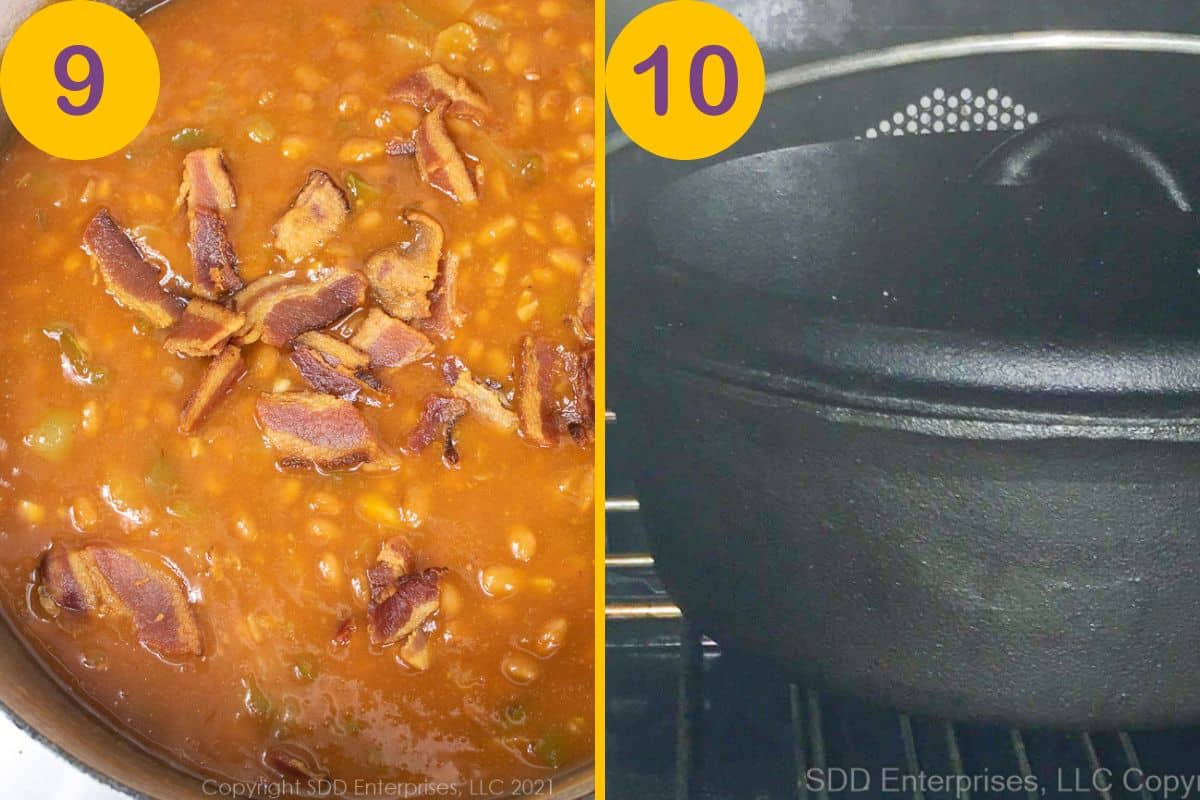
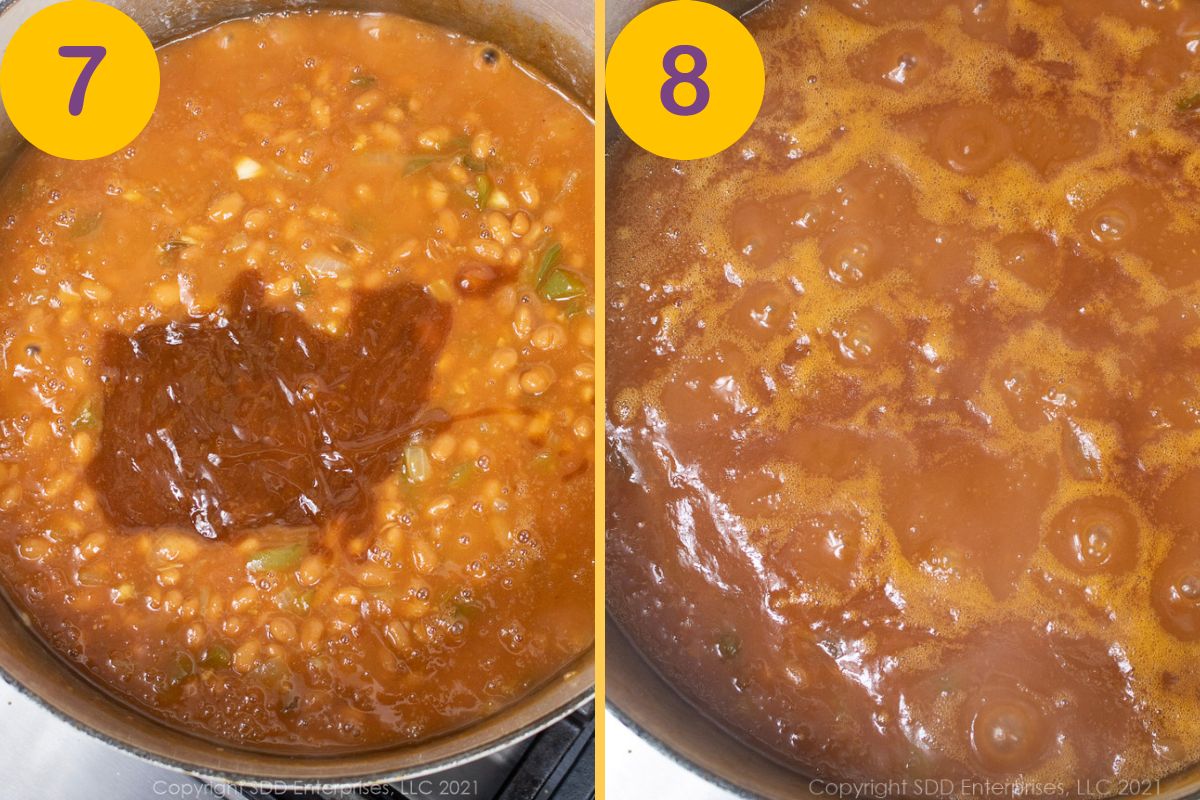
- After simmering for 5 minutes, add back the bacon and stir well.
- Place the lid on the Dutch oven and set it in the preheated oven (300 degrees Fahrenheit).
Lagniappe Tip: For optimal flavor, it should in that low oven for three hours, stirring completely every hour. Make sure to get all the beans off the bottom and sides and add some water if it's getting too thick. Likewise, if it's too watery, take the cover off the last 30 minutes.
I Don't Have All Day!
This recipe benefits from a low and slow cooking method, but, sometimes you don't have three hours to bake beans. Here are a few tips and suggestions that will save time and still turn out some darn good beans:
- Save the bacon grease next time you fry some bacon.
- When you cook bacon, never throw away the bacon grease. You can store it in a jar in the fridge for many months, then scoop out what you need (use about 3 tablespoons for this recipe). Keep it handy, it will save lots of time by not having to fry bacon for this recipe and others.
- Use vegetable or olive oil instead of bacon grease.
- Although smoked bacon and bacon grease lend a serious and special flavor to this recipe, sauteing the onions and pepper in vegetable oil or olive oil will save some time. It may not be bacon, but it's still pretty darn good.
- Saute until the onions just start to get clear, about 5 to 8 minutes.
- Caramelizing the onions slowly releases the natural sugars in the onions, adding sweetness and body to these beans. But this takes time (about 15 minutes) you may not have. This can save you at least 10 minutes.
- Skip the oven, and cook them covered over low heat on the stove.
- Go as long as you can, I'd go at least 30 minutes, but as long as they are completely warmed you can enjoy them. Maybe they aren't "baked" Baked Beans, but I won't tell anyone!
- Cook them a day in advance.
- If you don't have about 4 hours the day you want to serve the beans, cook them fully or partially the day before. Let the beans cool after cooking, then place them in the fridge. To serve, warm them on top of the stove or finish cooking them in the oven before you serve them.
Serving Suggestions
Pull the beans out of the oven and allow them to sit for 5 to 10 minutes. Serve as a side dish.
Potato Salad from Sweet Daddy D is the perfect companion for Baked Beans. Here are two great recipes:
These baked beans will be Darn Good with these:
If you make this recipe:
- Tell us about it in the Comments section below
- LEAVE A RATING ON THE RECIPE-worthy of 5-Stars?
- Questions or Comments? that's the place!
- SIGN UP FOR OUR EMAIL UPDATES so you don't miss anything!
- Post a picture and share it with your friends on our Social Media:
Yeah You Right!
Publishers Note: This article and recipe were originally published in April 2018. It is now being revised and republished with improved process photos and step-by-step instructions and improved search and navigation elements.
Recipe
Darn Good Baked Beans
Here's What You Need
- 4 @ 15 ounce cans pork and beans or 2 @ 28oz cans
- 3 slices smoked bacon sliced into 1" pieces (3 Tablespoons bacon grease)
- 2 cups yellow onion chopped-about 1 med-large onion
- 1 ½ cups green pepper chopped-about 1 medium pepper
- 2 tablespoons garlic minced-about 3 cloves
- 15 ounces water See Notes
Fixins'
- ½ cup brown sugar light or dark
- ½ cup ketchup
- 2 tablespoons yellow mustard
- 2 tablespoons Worcestershire Sauce
- Pinch kosher salt
Here's What You Do
- Preheat the oven to 300 degrees.
- In an oven-safe heavy Dutch oven with a lid, fry the bacon over medium heat until almost crispy and plenty of fat has been rendered. Remove the bacon from the pan and set aside. Make sure to leave the bacon grease in the Dutch oven.
- Continuing on medium heat, sauté the yellow onions and bell peppers in the bacon grease until starting to caramelize. Don't rush this step, it will take about 20 minutes. See NOTES.
- Add the garlic and stir until aromatic, about 2-3 minutes.
- Add the beans and mix well. Increase the heat until it comes to a simmer for a few minutes.
- While it's simmering, fill one of the cans with water. Pour the water from can to can to capture all the juice. Set aside. See NOTES.
- Add the Fixins' and combine completely. Add about ½ can of the water and increase the heat to bring it to a boil, set the remaining water aside. Cook on a slow simmer for about 5 minutes. Add back some or all of the bacon.
- Place in a 300 degree oven, covered for about three hours total. Stir every hour or so making sure to scrape the beans off the side and bottom, Add more water from the reserved can depending on how thick you like your beans.
Recipe Notes
Nutrition Estimate

It's Me!
Louisiana is a wonderful place where the rich cultural heritage enriches and entertains. I'm Dave Howson, aka Sweet Daddy D. I'm glad you found my website and I look forward to exploring the cultural mosaic of Louisiana with you…
read the "It's Me" page to find out more about me and this website…

Flange says
Very good... but, when tasting, I thought these were too sweet. I added 1 tsp of unsweetened cocoa mixed into an additional cup of water. The cocoa added a little bitterness (and pared down the sweetness) and the water made these a little less dense. I'm not sure these need to be cooked an additional 3 hours. But, overall, this is a make again with a little less sugar. Thanks!
Sweet Daddy D says
Interesting, Flange. I like the idea of you adjusting any of my recipes to your taste. Thanks for giving them a try.